|
|
|
Computers
This section is a collection of computer-related information; tips,
comments, suggestions, experiences and advice. Buying a new PC? Check my
PC Buying page!
Check Out These Websites
Computer Tips and Tweaks:
The consumer version of Windows is designed to run on the lowest common
denominator hardware and you can do a lot to improve performance if you
don't mind popping the hood, so to speak, and tinkering a little. Improvement predictions: from barely discernible to
30% or more. There are hundreds of websites that offer good tips on
speeding up your computer. Search out these links ... and use them. Some
of my favorite links for "anything Windows:"
Caution:
some of these websites take you into the "registry." Don't get into the registry
unless you know what you're doing - or have the time (lot's of it) to
fix errors or reinstall Windows!
Tip #1 - Do Basic PC Maintenance
Computer Maintenance:
Even if you do very little maintenance on your automobile, it's almost a
sure thing that you get regular oil changes and tire rotations. It's
basic maintenance. You need to do the same on your PC - basic
maintenance. Here's a (suggested) schedule of basic PC maintenance. The
precise procedure for this maintenance depends on your version of
Operating System and installed software, but this will get you started
(based on Win XP):
-
Daily, or each time you finish using the PC on the Internet delete
your .tmp/.temp files and cookies. In Internet Explorer go to Tools,
Internet Options, General tab, and then Delete cookies and Delete
files.
-
Weekly, run your spyware / adware program and remove any identified
files. (Deleting your .tmp/.temp files and cookies first will speed up
this operation). Need a spyware program? -
go here
and get it.
-
Weekly, run your antivirus software (keep your virus definitions up
to date!). Be sure it looks at all files including inside ZIP files.
Set your antivirus software to scan incoming and outgoing emails. If
you need a good, free antivirus program,
go here
and get it.
-
Monthly, or more often if you do a lot of work on your PC, run the
defrag software to make the files on your hard drive contiguous
again. In WinXP, go to Start, Programs, Accessories, System Tools,
Disk Defragmenter.
-
Yearly, make sure you have all your original CDs for reinstallation,
then format your hard disk and start over! This may seem a bit
drastic, but it pays big performance benefits as well as getting rid
of all the "stuff" that collects on your PC.
- TIP
- leave your computer on 24/7 and automate many of these tasks using
Windows Scheduled Tasks, aka Task Manager. (Go to: Start,
Programs, Accessories, System Tools, Scheduled Tasks).
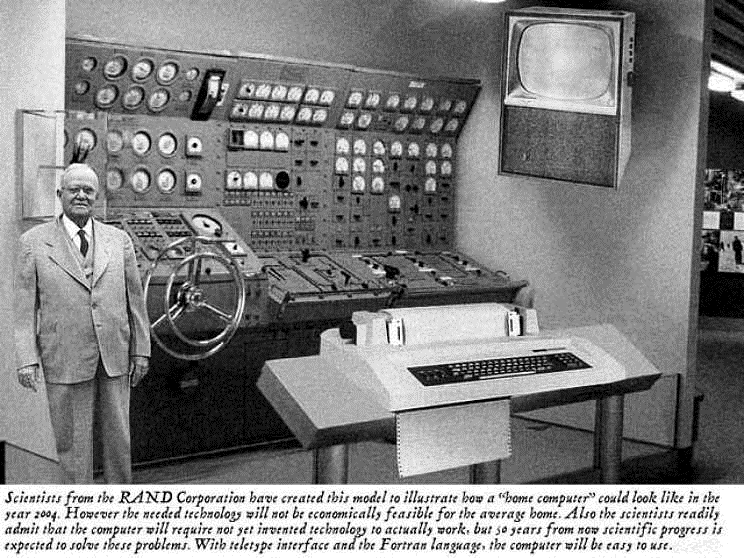
Wow, Check Out This Computer:
In 1954, Popular Mechanics Magazine
published this picture of how a computer may look in the year 2004 -
check out the "joy stick" - enough to steer the Queen Elizabeth II! Click the thumbnail for the
full size pic,
then your back button to return here.
Tip #2 - Add Memory or Configure
Virtual Memory
One of the biggest single things you can do to speed up your computer
is to add more physical memory. If you can't add physical memory, tweak
virtual memory. All programs will run faster when there is sufficient virtual
memory always allocated and ready. Here's how in WinXP. From the Windows
desktop...
- right click on "My Computer"
- select "Properties" item in
the menu
- select "Advanced" tab
- in the "Performance"
section, select "Settings"
- under "Visual Effects" select "Adjust
for best performance" (this isn't virtual memory, but it helps)
- click the "Advanced" tab
- under "Virtual memory," click "Change"
- if you have more than one drive, select
the fastest drive, then click the "Custom
Size" radio button
adjust the "minimum" value box from
2
to 5 times the amount of your installed RAM - Make the min and max value the same so Windows doesn't
have to resize the swap file.
- click the "OK" button
three times and then restart your computer.
Tip #3 - Configure Memory, Free-up
L2 cache
Programs will run as fast as possible if recently used
elements can stay in L2 Cache without any competition from other
programs, so do the following:
- Any screen activity (even moving
the mouse) will hammer the cache so offload graphics
tasks from the CPU to a good graphics card (I prefer ATI cards like
the Rage-128 or the Radeon). A screen saver will waste CPU cycles
and will also hammer the L2 Cache every time the OS allows it a time
slice to run (tens to hundreds of times per second) so get rid of
your screen saver. Newer monitors don't have a phosphor burn-in
issue, and LCD panels don't need screen savers at all. (Note: ATI -
a Canadian company located in Thornhill, just north of Toronto, make
fabulous graphic cards, but unfortunately they can't write software
- their software (such as the ATI Multi-Media Center) crashes
frequently so avoid it).
Tip #4 - Always run a virus shield
- If a virus shield is enabled to
constantly run in the background, and it should be ... make sure
that all incoming data (via floppy, email, download, USB key, etc.) is fully
scanned (select "all files" and also enable "scan compressed files")
but never turn off virus checking unless you have a specific reason
for doing so. The best way to avoid a virus is to be very cautious
of emails from people you don't know.
Tip #5 - A few of my personal
tweaks...(for WinXP)
-
First off, implement the four tips above, then...
- If you have MS-Office installed
then consider finding and deleting the program "findfast.exe". This
program will run in the background to maintain an index of every
file on the disk. Unless you're in "Office" all day searching for
files it's a waste of resources.
-
Disable System Restore - Right-click "My Computer" and choose
Properties. Click System Restore tab, check the "Turn off System
Restore on all drives..." check box. Click OK. Why? It rarely works
right and sometimes can overwrite updated files with older, possibly
corrupt files. And it will save you some hard drive space.
- Turn
off Error Reporting - Right-click "My Computer" and choose
Properties. Click the Advanced tab, click Error Reporting (at the
bottom of the box). Click Disable Error Reporting and click "But
notify me when critical errors occur." Click OK twice. Why? It
wastes your time and ties up your machine. (Microsoft has been in
business 30 years - a few error messages from you is not going to
help them)!
-
Improve performance by turning off Visual Effects - Right-click "My
Computer" and choose Properties. Click the Advanced tab. In the
Performance box, click Settings. Click the Visual Effects tab and
then check "Adjust for Best Performance." Click OK twice. Why? Many
of these visual effects drain system resources and slow your
computer.
- Give your machine the three-finger
salute (ctrl-alt-del) then click on
task manager, then
processes to see everything that is
running on your machine - you'll be surprised. Many of these are
necessary to the operation of Windows, but some are superfluous.
Do
a search on each one and investigate - you can disable non-essential
services. For example, if you don't have a wireless Internet
connection, you can safely disable the Wireless Zero Configuration
Service, wcz.exe. See Tip #7 for the remaining services you can
disable.
Tip #6 - Configure DMA correctly
Many computers are improperly set up in both hardware and in Windows
for DMA support. This means that DMA (direct memory access) transfers between
high performance hard drives and your motherboard are usually disabled
in one or two places. Without DMA your processor must directly orchestrate
hard disk data transfers which means it suspends all other work while
doing so. Since Windows is a virtual memory system, this is going on all
the time (paging/swapping), not just when you save/load application data
or start new executables. You can enable DMA by doing both of the following
(see Warnings below):
-
enable DMA
support in hardware by going into your motherboard BIOS. Make sure that
DMA or UDMA (Ultra DMA) is
enabled or set to auto.
-
enable DMA
support in Windows, by doing the following:
- right click on "My Computer"
- click on "Properties"
- click on the "Device Manager" tab
- double click on "Disk Drives"
- double click on the drive you wish to enable
- click on the "Settings" tab
- enable the "DMA" check box
- click "OK"
Warnings:
- Don't waste your time enabling DMA
if your hardware was manufactured before 1998.
- DMA is a high performance feature
borrowed from mini and mainframe systems. It usually doesn't work
properly on el-cheapo or over-clocked motherboards.
- Do not enable DMA on a drive in
Windows if that drive's hardware doesn't support it (all newer
drives support DMA while most older ones do not). If you enable DMA
on a drive that doesn't support it, then you
may not be able to reboot
your machine. If you're not sure if your drive(s) support DMA but you just can't
resist trying this, like me, then take the following precautions:
Create an alternate hardware profile.
In Win XP:
- right click on "My Computer"
- click on "Properties"
- click on "Hardware Profiles" tab
- click on "Original Configuration"
- click on "Copy"
- enter an alternate name in the text box like "Backup_for_DMA"
- now go through the
enable DMA support in Windows
described above then reboot
- when you reboot you'll be
given the chance to select one of the hardware profiles so
choose the one that was active when you made the changes (should
be "Original Configuration" if you haven't already booted an
alternate hardware profile)
- if your system doesn't come up
just reboot and choose the copied profile (remember to
go back into hardware profiles and delete the original
configuration)
Tip #7 - Create an "Optimized"
Profile
Create an alternate hardware profile (Tip #6 tells how) and optimize
it by disabling non-essential services that run in the background,
gobbling up scarce system resources. Name your new profile 'Optimized'
so you'll know what it is. Don't do this to your original boot profile:
the alternate profile gives you a safety net - you can boot using the
original profile if any of these services need to run, restore them to
the optimized profile, and then reboot. Here is a list of services you
can safely disable on most machines.
| |
1. |
Background Intelligent Transfer
Service (svchost.exe) |
| |
2. |
Clipbook (clipsrv.exe) |
| |
3. |
Computer Browser (svchost.exe) |
| |
4. |
Error Reporting Service (svchost.exe) |
| |
5. |
Help and Support (svchost.exe) |
| |
6. |
Human Interface Device Access (svchost.exe) |
| |
7. |
Indexing Service (clsvc.exe) |
| |
8. |
IPSEC Services (lsass.exe) |
| |
9. |
Messenger (services.exe)
|
| |
10. |
Net Meeting Remote Desktop Sharing
(mnmsrvc.exe) |
| |
11. |
Net Logon (lsass.exe) |
| |
12. |
Network DDE (netdde.exe) |
| |
13. |
Network DDE DSDM (netdde.exe) |
| |
14. |
Network Location Awareness (svchost.exe) |
| |
15. |
Network Provisioning Service (svchost.exe) |
| |
16. |
Performance Logs and Alerts (smlosvc.exe) |
| |
17. |
Portable Media Serial Number
Service (svchost.exe) |
| |
18. |
QoS RSVP (rsvp.exe) |
| |
19. |
Remote Desktop Help Session
Manager (sessmgr.exe) |
| |
20. |
Remote Registry Service (svchost.exe) |
| |
21. |
Routing and Remote Access (svchost.exe) |
| |
22. |
Secondary Logon (svchost.exe) |
| |
23. |
Server (svchost.exe) |
| |
24. |
Smartcard (SCardSvr.exe) |
| |
25. |
Smartcard Helper (SCardSvr.exe) |
| |
26. |
SSDP Discovery Service (svchost.exe) |
| |
27. |
TCP/IP NetBIOS Help Service (svchost.exe) |
| |
28. |
Telnet (tintsvr.exe) |
| |
29. |
Uninterruptible Power Supply (ups.exe) |
| |
30. |
Upload Manager (svchost.exe) |
| |
31. |
Webclient (svchost.exe) |
| |
32. |
Windows Time (svchost.exe) |
| |
33. |
WMI Performance Adapter
(wmiapsrv.exe) |
Tip #8 - Make a Bootable CD
You really do need one. Click
here to see how to make it!
Tip #9 - Control Startup Programs
in the System Registry
One of my big annoyances is those programs that take over your system
and add things - without your permission - to the System Tray (aka the
Notification Area). This is where the clock is located on the lower
right corner of the desktop. These programs or 'applets' start up when
you turn the computer on. Rogue programs put the startup instructions
into the system registry so you can't easily turn them off. Here's how
to get rid of the ones you don't want. First, the usual caution about
working in the registry: make a backup and be sure you know how to
restore it in the event you need to! Not sure how to do that?
Go here
to find out.
The registry is a hidden database in your computer that controls every
aspect of your PC. It's hidden for a reason - mess it up and your
computer is toast! Startup programs are usually hidden in one of the
"hives" in the registry. Most startup programs will be located in one of
these hives:
HKEY_LOCAL_MACHINE\SOFTWARE\Microsoft\WindowsNT\CurrentVersion\Winlogon\Userinit
HKEY_LOCAL_MACHINE\SOFTWARE\Microsoft\Windows\CurrentVersion\Run
HKEY_LOCAL_MACHINE\System\CurrentControlSet\Services
HKEY_LOCAL_MACHINE\SOFTWARE\Microsoft\ActiveSetup\InstalledComponents
HKEY_LOCAL_MACHINE\SOFTWARE\Microsoft\Windows\CurrentVersion\Explorer\SharedTaskScheduler
HKEY_LOCAL_MACHINE\SOFTWARE\Microsoft\Windows\CurrentVersion\Explorer\ShellExecuteHooks
HKEY_LOCAL_MACHINE\SOFTWARE\Microsoft\Windows\CurrentVersion\Explorer\Shell
Extensions\Approved
HKEY_LOCAL_MACHINE\SOFTWARE\Microsoft\Windows\CurrentVersion\Explorer\Browser
Helper Objects
HKEY_LOCAL_MACHINE\SOFTWARE\Microsoft\InternetExplorer\Toolbar
HKEY_LOCAL_MACHINE\SOFTWARE\Microsoft\InternetExplorer\Extensions
HKEY_LOCAL_MACHINE\SOFTWARE\Microsoft\WindowsNT\CurrentVersion\Winlogon\Notify
HKEY_LOCAL_MACHINE\System\CurrentControlSet\Services\Winsock2\Parameters\Protocol_Catalog9
HKEY_CURRENT_USER\Software\Microsoft\Windows\CurrentVersion\Run
HKEY_CURRENT_USER\Software\Microsoft\Windows\CurrentVersion\RunOnce
HKEY_USERS\.Default\Software\Microsoft\Windows\CurrentVersion\Run
HKEY_USERS\.Default\Software\Microsoft\Windows\CurrentVersion\RunOnce
One more place to check... click on Start, Programs, Startup and see
what's in there... if you don't like it, just drag it off the menu into
the trash bin! Keep in mind none of these will uninstall the program -
they just control what starts and what doesn't. You CAN take back
control of your PC!
Above all, have fun messing up your system: you'll learn tons of
stuff as you work to fix it.
Tip #10 - Coming Soon
Check back!
Top of Page
Home
|
|
|
|